Tutorial Overview:
This advanced tutorial explains how to add custom form fields (cart attributes) to Shopify cart pages to collect additional customer information. The data appears in order details within the admin panel. Examples include dropdown menus asking “How did you hear about us?” or delivery preferences.
Key Distinctions:
Cart attributes differ from order notes (special delivery instructions) and line item properties (product-specific customizations)
Only compatible with cart pages, not cart drawers or popups
Instructions vary between Sectioned themes (post-October 2016) and Non-sectioned themes (older)
Implementation Steps:
Use the Shopify UI Elements Generator tool to create form field code
Paste generated code into cart-template.liquid or cart.liquid before the closing </form> tag
For required fields, remove the novalidate attribute from the opening <form> tag
Optional: Add display code to email notifications and Order Printer templates
Common Issues Reported:
Required fields not preventing checkout, especially with express checkout buttons (Apple Pay, Google Pay)
Dropdown fields not displaying properly despite correct code
Cart attributes not appearing in order backend
“Error updating cart” messages when typing in fields
Missing </form> tags in some theme structures
Status: Discussion remains open with unresolved technical issues around field validation and express checkout compatibility.
Summarized with AI on November 9.
AI used: claude-sonnet-4-5-20250929.
This is an advanced tutorial and is not supported by Shopify. Knowledge of HTML, CSS, JavaScript, and Liquid is required. Consider hiring a Shopify Expert if you aren’t comfortable doing the steps in the tutorial.
Cart attributes are custom form fields that let you collect additional information from your customers on the cart page. The information that you collect will display in a note on the customer’s order in the admin. For example, if you want to ask customers how they heard about your store, then you can add an How did you hear about us? drop-down selection question to the cart.
Tip: Cart attributes are different from order notes and line item properties. Order notes, which are available in every free Shopify theme, let you capture special instructions on how to prepare and deliver an order. Line item properties are used to record customization information about specific products in an order. Line item properties are specified directly on the product page.
Sectioned themes and non-sectioned themes
The steps for this tutorial differ depending on whether you are using a sectioned or a non-sectioned theme. A sectioned theme is a newer theme that lets you drag and drop to arrange the layout of your store’s pages.
To figure out whether your theme supports sections, go to the theme’s Edit code page. If there are files in the Sections directory, you are using a sectioned theme. Non-sectioned themes were released before October 2016, and do not have files in the Sections directory.
If you are using a sectioned theme, then click the Sectioned themes button and follow the instructions. If you are using an older, non-sectioned theme, then click the Non-sectioned themes button and follow the instructions.
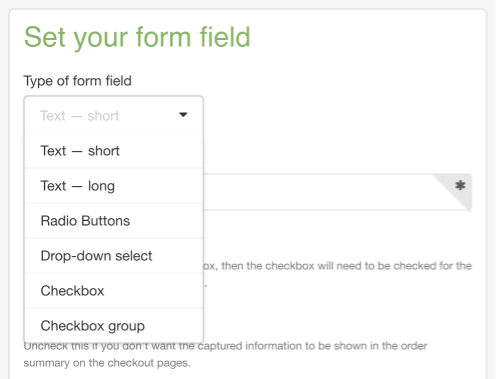
You can add as many custom form fields to your cart form as you need. You can use the Shopify UI Elements Generator tool to easily generate the HTML and Liquid code for each form field that you want to add to your cart page. This tool was created by Shopify to help simplify the process of adding custom user interface elements, such as form fields and icons, to Shopify themes.
If you want your theme to prevent customers from reaching the checkout before they have filled in your form field, check Required.
You can see a preview of your form field in the Preview section.
Copy the generated code from the box in the Grab your code section.
Add a form field to your theme code
To add a custom form field:
From your Shopify admin, go to Online Store > Themes.
Find the theme you want to edit, and then click Actions > Edit code.
In the Sections directory, clickcart-template.liquid. If your theme doesn’t have acart-template.liquid, then, in the Templates directory, click cart.liquid.
On a new line right above the closing </form> tag, paste the code that you copied from the Shopify UI Elements Generator. You can experiment with putting the code in different places to see where the form field appears on your cart page.
If you set your form field to be required, then you will need to remove the novalidate attribute from the checkout form. Findnovalidate, which is inside the opening <form> tag. The code might look something like this:
The new field is shown on the order page of your admin in the Additional Details section.
Note: Cart attributes can be added only to a cart page, and are not compatible with cart drawers, or cart popups. To change your cart style, go to the theme editor.
Show cart attributes in email templates
You can show cart attribute information for orders in your email notification templates. To add cart attributes to an email template, add the following code to the template in the place that you would like the cart attributes to be shown:
<h4>Additional details</h4>
<p>
{% for attribute in attributes %}
{{ attribute | first }}: {{ attribute | last }}<br>
{% endfor %}
</p>
Show cart attributes in Order Printer templates
If you use the Order Printer app to print your orders, you can add some code to your templates to show cart attributes on your printouts. To add cart attributes to an Order Printer template, add the following code to the very bottom of the template:
{% for attribute in attributes %}
{{ attribute | first }}: {{ attribute | last }}<br>
{% endfor %}
You can add as many custom form fields to your cart form as you need. You can use the Shopify UI Elements Generator tool to easily generate the HTML and Liquid code for each form field that you want to add to your cart page. This tool was created by Shopify to help simplify the process of adding custom user interface elements, such as form fields and icons, to Shopify themes.
You can see a preview of your form field in the Preview section.
Copy the generated code from the box in the Grab your code section.
Add a form field to your theme code
To add a custom form field:
From your Shopify admin, go to Online Store > Themes.
Find the theme you want to edit, and then click Actions > Edit code.
In the Sections directory, click cart-template.liquid. If your theme doesn’t have acart-template.liquid, then, in the Templates directory, click cart.liquid.
On a new line right above the closing </form> tag, paste the code that you copied from the Shopify UI Elements Generator. You can experiment with putting the code in different places to see where the form field appears on your cart page.
If you set your form field to be required, then you will need to remove the novalidate attribute from the checkout form. Findnovalidate, which is inside the opening <form> tag. The code might look something like this:
The form field is shown on the order page of your admin in the Additional Details section.
Note: Cart attributes can be added only to a cart page, and are not compatible with cart drawers, or cart popups. To change your cart style, go to the theme editor.
Show cart attributes in email templates
You can show cart attribute information for orders in your email notification templates. To add cart attributes to an email template, add the following code to the template in the place that you would like the cart attributes to be shown:
<h4>Additional details</h4>
<p>
{% for attribute in attributes %}
{{ attribute | first }}: {{ attribute | last }}<br>
{% endfor %}
</p>
Show cart attributes in Order Printer templates
If you use the Order Printer app to print your orders, you can add some code to your templates to show cart attributes on your printouts. To add cart attributes to an Order Printer template, add the following code at the very bottom of the template:
{% for attribute in attributes %}
{{ attribute | first }}: {{ attribute | last }}<br>
{% endfor %}
I have followed your instructions and pasted the code that was generated by the Shopify UI Elements Generator. The preview showed me exactly how I wanted this form field to look. I wanted to create a form field with a drop down list for the customer to select their preferred charity.
When I tested it and viewed how the Cart page looked, I found that ONLY the Label name came up and the drop down field was not visible.
Any clues as to what I might have done wrong here?
I have attached the screenshot of my cart-template.liquid within my theme showing you where I embedded the code the the UI Elements generator created.
I have also attached the screenshot of what my shopping cart looks like after I embedded the code.
For your reference, the theme I’m using is Envy by Wetheme.
Hello, this tutorial is really helpful and I manage to add a required checkbox on my cart page.
However, the “required” field in combination with the removal of “novalidate” attribute in the form doesn’t prevent the customer to proceed with checkout through the additional checkout buttons (Google Pay, Apple Pay etc). Is there any way to block the user to compile required fields before heading to the quick checkout experience?
I’ve having issues with making cart attributes required. Coding looks okay but customers can still proceed to check-out without filling in required fields.
but I can’t get it to validate. I’m trying to use javascript but don’t think I’m getting it quite right. Could someone help me get the right code possibly?
Here’s what I have but I know it’s incomplete:
$(".template-cart form[action='/cart']").on("submit", function(e){
  $(".cart_error").remove();
  if(#resale-certificate == ""){
   alert("Please enter your Resale Certificate #");
   attributes[Resale Certificate].focus();
  return false;
  }
  if(#federal-tax-id == ""){
   alert("Please enter your Federal Tax ID #");
   attributes[Resale Certificate].focus();
  return false;
  }
});
Also, I have this at the bottom of the theme.js file under the last line:
I want to add a reference form to my cart at checkout. Used the form creator. Followed instructions as noted to add code. No dropdown appearing anywhere.
Please help!
Theme: Minimal
Some pages customized in PageFly ( not cart or checkout)
Hi, I am not seeing any tag in my code. I do not have a cart-template.liquid. under Sections so I checked under Templates in cart.liquid but there is not tag. I tried placing the code from the Shopify UI Elements Generator in there anyway but it is not showing anything in the checkout cart when I preview the theme. Is there somewhere else I can post it? Thanks
I have been running the code and now the box appears in my cart and is mandatory. However I don’t get notified about what the customer typed in the box. Any ideas why that could be?