Full width photo off product under product description

Hai everyone,

So i cant vigure it out. I have the Brooklyn theme and I put some pictures in the product description (2000X1000PX pictures). So i wanted that those pictures are full width under the product photos. So far it works on mobile phone. But when you check it on desktop, you have on the left site white blanc page and right the text with the pictures. So eather i need to make the text description fulll width. Or a app where you can put some pictures under the description so show. The idea is that when you scrolle trough the product page you get some pictures in full width. And not the standard text like all the other pages.

Can someone please help me?

can you share the URL to a product page?

My bad i exedently accept that its done but it isnt. I cant provide you the link because its not publisht

You can still share a link even though it is not published. Preview your theme and there will be a bar that appears at the bottom of your screen with a button that says “Share Preview”.

https://help.shopify.com/en/manual/using-themes/adding-themes#share-a-theme-preview-with-others

Oke but even than i dont want to shae my link here. So is there a solution how i can imagine my problem?

1 Like

If you want help, share your link. Everyone’s theme is different, no one has any idea what you’ve already done to your code. There’s no reason not to share it, no one can buy anything from your store, and no one cares what your store looks like. It’s too hard to diagnose a problem through screenshots and trying to talk it through.

Do you know anything about HTML and CSS? How did you get these pictures onto your product page in the first place? Is it in the code or is it through some app that you’ve purchased?

If you want a guess answer, I can tell you that your product page is probably split into a half and half container. Half product images, and then half description and add to cart etc. Since you’re seeing your photos on the right side, you’re probably still in the second half of the container. The reason they appear alright on mobile is that those two halves stack on top of each other at a certain screen width, and then both take up 100% of the viewport. You need to put the photos outside of that container.

1 Like

I know something about editing, not everything.

I think you dont understand me. All the shopify themes are not full width. I put the pictures in the description text. So you have the photo of youre product, under it you have a add to cart button, and than you have a product description. In this product description you can put photos so many as you want. I put a 2000x4000px photo in it. On the mobile phone its full width because the product description is always under the add to cart putton. But with the desktop version its not. you have on the desktop on the left side your product picture, and on the right your description. So my question is not rocket science. There are many other topic about this same question, every one is helpen, but it didnt helped me. I still have a brooklyn stock version. Didnt edit nothing

Okay well your problem is that it’s in the product description. Your theme is set up so that it displays half and half on desktop like I said. Your product description is on the second half. If you want to change that, you need to go into your product.liquid and put the product description outside of the container, but then the entire description will be outside it and not just the photos you want to be outside. I understand your problem, and I know it’s not rocket science, but it’s a little more complicated than you seem to think. One option I can think of is to put a unique character between your product description and the images that you want to show up underneath. This way, in product.liquid you can check to see if your product.description contains that character, split it by that character, and echo the first part of your description out inside the container, and then echo the image part out underneath the container. So kind of like this:

Here's your product description. Some other stuff. This is a mocked up description of a product and I don't really know what else to type here

~

<img src="path-to-your-image1.jpg">
<img src="path-to-your-image2.jpg">

Then in liquid on your product.liquid, split it by the “~”

 {% assign descriptionPieces =  product.description | split: "~"  %}

<div class="product_wrapper">
<div class="product_image">
<img src="{{ product.image.src }}">
</div>
<div class="product_description">
{{ descriptionPieces[0] }}
</div>
</div>
{{ descriptionPieces[1] }}

Don’t worry, it’s not rocket science. Im sure you’ll figure it out.

1 Like

Thanks for the quick response! I appreciate that! I also thought to make the description wider. It’s not a problem I think. If I choose the first option I can always make a banner with text in it. But the second option you mention is very attractive. For me it’s difficult to understand everything because my English is bad. And this is just my second store. Editing I did before but this is a step further. But if I understand you. When I choose second option I can split the description in 2? But is that even possible. I mean if I do the coding do you see also this in the product page in shopify where you can change text ect?

It’s definitely possible, we do something similar on our store. You can actually use code inside of the editor where you change text, you just have to click this little button in the top right:

By clicking that button you can actually add HTML, CSS, and Javascript into your product description. This way you can actually see what is generated after you use the regular editor, this is important because that is what you get when you use {{ product.description }}. Sometimes there may be HTML you didn’t know about that was added when you typed stuff into the regular editor.

Lets say you added the " ~ ", and you were trying to split by that in liquid. It could be problematic because if you added that in the normal editor, it may have done something you didn’t mean to, like add “

” tags around it. So when you do {{ assign descriptionPieces = product.description | split: “~” }} It would leave the first half of the

tag in descriptionPieces[0] and the closing

tag in descriptionPieces[1], which could actually break your layout. The best way to be sure is to click that little button in the picture above, and be sure there’s no HTML around whatever you use for your marker, and split by that. The " ~ " will not be visible in your finished code because it gets “cut out” when you do the split.

1 Like

So my head is confused right now. I understand what you are saying like theoretically. But now i have to magne that in my shopify. You are now talking about to split the screen. Oke i understand. But when everthing is already spli on my real online store like you said before (left side is blanc and the right one is text). Souldnt i need to make the description first full width? So by edeting code, do you still understand what im meaning? And also can you please tell me how to put it in the product description like you show with youre print screen. I know that you can change that to html. But i putted the link like you mantioned before but it aint working. BTW i appreciate your help realy!

I am at work right now, but when I get home I will try to make a step by step with visuals on what exactly I mean, cause there’s obviously a little bit of a language barrier going on here.

The approach I’m suggesting is what you should do if you don’t want to make the description full width, but at the same time have your images full width.

This will give you two pieces of your description (this must be done in your product.liquid, not in the editor for the product):

{% assign descriptionPieces = product.description | split: '~' %}

// This gives you: {{ descriptionPieces[0] }} and {{ descriptionPieces[1] }}
//descriptionPieces[0] will be your actual description
//descriptionPieces[1] will be your images

This way, you can put {{ descriptionPieces[0] }} still inside the right side of your container, and you can put {{ descriptionPieces[1] }} outside.

I will try my best to explain with images when I get home tonight.

1 Like

O man thanks a lot for helping really, and yeah language barrier is a problem lol. but take your time i will go to bed now and see it in the morning. I really appreciate that you want to help. So can you show me then also where i have to put it in? I think over here?

Haha well I can’t exactly tell you without being able to see your page :slight_smile: , cause I don’t know if that’s the end of your container. I don’t think it is. I will use the default Brooklyn Theme in my example I make up for you.

LOL no its not the end. I always think theoretically. So when you say all down, thats means you will also go under the share links for example insta or facebook. So thats why i thought it need to be there. But like i said thank you for your help, i will wait when you post the tutorial!

Alrighty here we go!

So here’s my default Brooklyn theme product:

This is how it appears after I just added the stuff in the editor. That image is 3000x2000, but since it’s on the right side of the container, it can’t get any bigger. So here’s what it looks like in the editor:

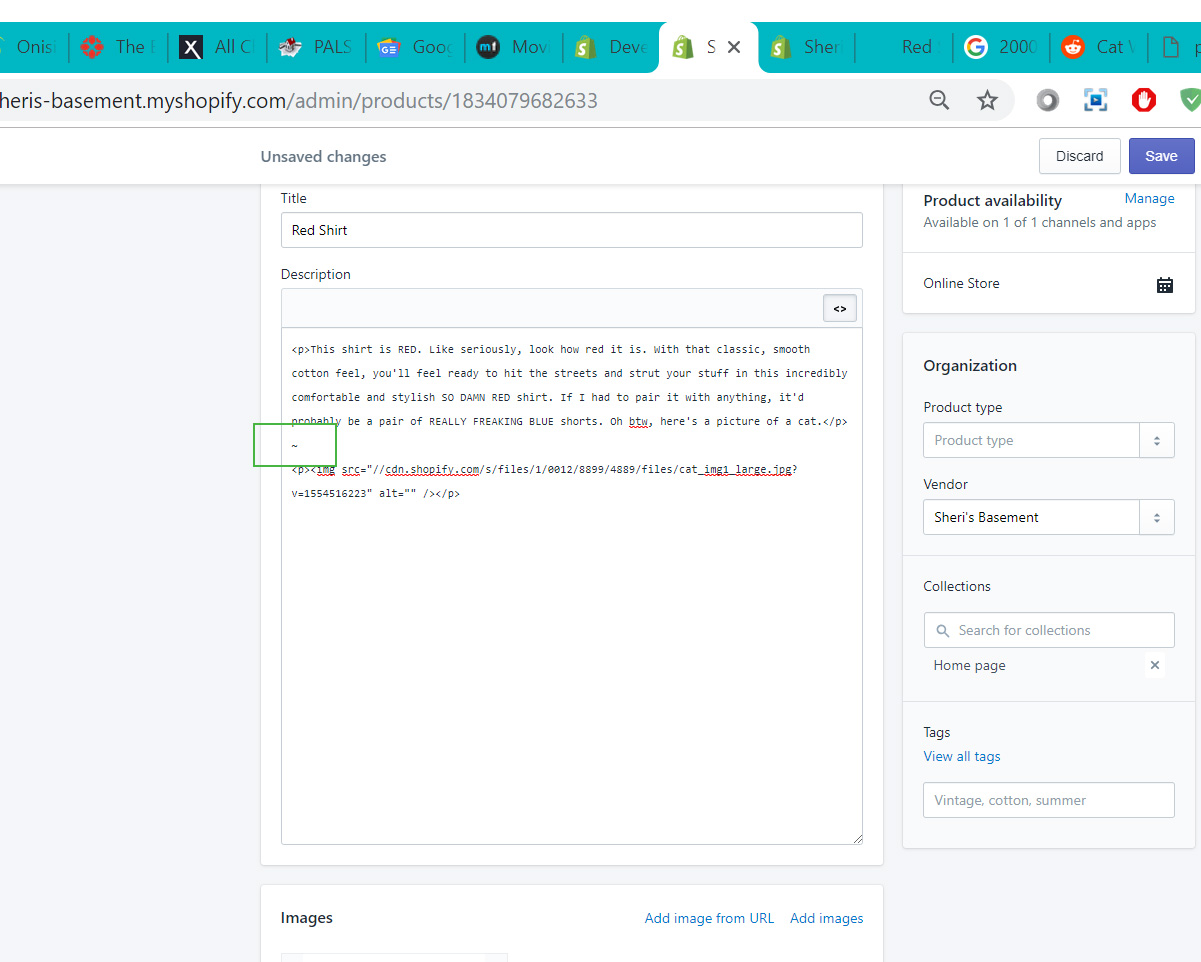
Notice the " ~ " in there. I did that inside of the editor and NOT inside the HTML mode, but when I check the HTML mode I see this:

The " ~ " is surrounded with

tags, we should eliminate those so all that we need to split by is the " ~ ". So remove the

tags around it.

Now, lets go into the product.template file in your sections folder:

So on products that you don’t have these images in, you’re not going to want to do this operation. So you’ll make an “if” statement to check for your " ~ " inside of your product description. Then we’ll say "If the product description has the ‘~’, then split the product description by ‘~’ and put the first piece where the old product description should have gone, and if it does not have the “~”, then just do the product.description normally. THEN, underneath the third div tag underneath the social media section, we will check again with another if statement to see if the description had that " ~ ", and if it does we will place the second desctriptionPieces there, with no other condition. Like this:

Now this is what I get when I look at my red shirt page:

Product description above the container, and image below the container. And just to show it doesnt happen on another product, here’s the black shirt page with the same image underneath without the “~” in the description:

So here you can see there’s no " ~ " there, so it does not perform the operation we just made.

I hope this clears things up more for you. Just let me know if you have any questions about anything.

2 Likes

So first of all thank you for your tutorial. You are a really genius! It worked very fine for you. I did everything like you said, but when i take a look at my online store the description is gone and also the pictures under the text. I could not youse copy paste so i have typed everything like you mentioned. So did i make a mistake somewhere?

Where you assign your variable you have “products.description” , should only be product.description

What do you mean by that? I have products from oberlo, do you meaning this?

In your code where you assign your “descriptionPieces” variable, you have it as:

{% assign descriptionPieces = products.description | split: ‘~’ %}

It should be “product.description” not “products.description”