Each of my products have 3 variants (print type, size, and framing/hanging style). When you select the first variant (print type) , then go to the next variant drop-down menu (size), all the unavailable sizes show up as “___ - Unavailable”. The same happens for the third drop-down menu.
This has caused confusion with almost every visitor to the site, and I believe is inhibiting sales. Can someone please tell me how to hide the unavailable variant options or at the very least grey them out? I would prefer a free fix, instead of a paid app.
Thank you a ton! This has been a headache for me for months.
Topic summary
A user running a Shopify store with the Dawn theme is struggling with variant selection dropdowns that display unavailable options as “___ - Unavailable,” causing customer confusion and potentially lost sales. Each product has three variant types: print type, size, and framing/hanging style.
Initial Solution (Partial Success):
- A community member provided code to hide unavailable options in
product-variant-options.liquid - This successfully removed unavailable options from dropdowns when clicked
- However, the preview text still defaults to unavailable options before opening the dropdown, making products appear out of stock
Improved Solution:
- Another user shared a JavaScript snippet to be added via a “Custom Liquid” section in the theme customizer
- The code automatically removes unavailable options and updates the default selection
- Implementation requires: Theme → Customize → Navigate to Product page → Add “Custom Liquid” section below “Product information” → Paste code wrapped in
<script>tags - This solution was confirmed working on Dawn 15.3.0
Current Status:
The thread appears resolved with the JavaScript solution, though the original poster hasn’t confirmed final implementation. An alternative offer for direct collaborator access to debug was also made but not pursued.
Hello @coletteraine ,
Can you please let me know which theme you are using?
I am using the Dawn theme.
in case its helpful - My website is galleryofgrace.org
Hi @coletteraine,
Please go to Actions > Edit code > snippets > product-variant-options.liquid file and add code here:

Code:
{% if option_disabled -%}
        hidden
      {% endif %}
If I helped you, then a Like would be truly appreciated.
Thank you for your response. This worked partially! So, going in a good direction, but not all the way there yet. I really appreciate your help so far, and really hope this community can help me troubleshoot this. Thanks in advance for your support!!
Here’s what’s happening: When I select an option for Variant 1 (Print format), now the unavailable options do not show when I click on the drop-down for Variant 2 & 3 (Size & Frame/Hanging style)
BUT after i select Variant 1 (print format), the preview for selectable options for Variants 2&3 is defaulting to the first option on Variant 2&3’s lists, even if that option is unavailable.
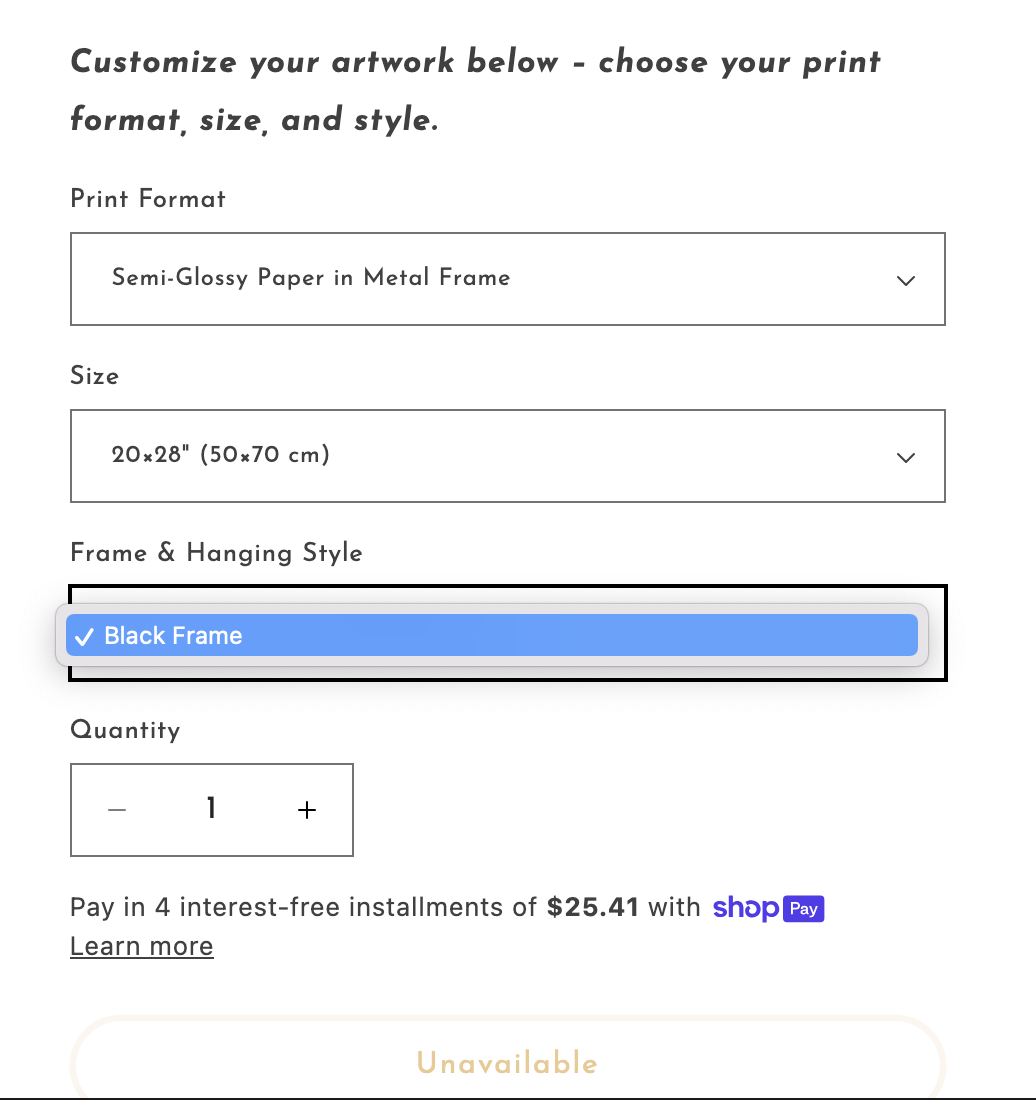
Here are a few screen shots to explain. For this example, I am using YESHUA – Radiant Jesus Painting in Glory (Christian Art) – Gallery of Grace
This is what shows when you first visit the page:

Now I’ve selected "Semi-Glossy Paper in Metal Frame” for Variant 1 (print format):

The only sizes that the “Semi-Glossy in Metal Frame” comes in is “20x28” (50x70cm)” and “8x12” (21x30cm)” BUT as you can see, the preview option for Variant 2 displays an unavailable size.
And the “Add to cart” button, instead shows “Unavailable.”
….(please note the difference between 20 vs 21 cm in the Size options - Sorry, I know that difference is subtle - I wish my print shop didn’t do that)
The part that IS working is that when I click on the drop down menus for Variants 2&3 (see screen shots below), the correct variant options show up.
***The problem with this is that most customers will stop at the step above and just think that the product is not available - I know because I’ve gotten several inquiries asking why everything on my site is unavailable.

And, only after you physically click on the text that says “____ - Unavailable” in order to open variant 2 &3’s drop down menus, and select the available options, does the “Add to cart” button appear

In my library there is this code snippet – you may try it in your store.
It should work with unmodified Dawn theme using drop-downs.
Add a “Custom liquid” section to your product page template. Paste this code:
<script>
document.addEventListener('DOMContentLoaded', () => {

  let unavailableRE = false;
  try { /* to auto-determine how to match the unavailable option, language independent with fallback below */
    let template = "{{- 'products.product.value_unavailable' | t: option_value: '.+' -}}";
    if (!template.includes('value_unavailable')) unavailableRE = new RegExp(template);
  } catch {};

  cleanupVariantSelectsIn = (parent) => {
    if (!parent) return;
    console.log('Clean up variant-selects:', parent);

    selects = parent.querySelectorAll(".select__select[name^=options");
    selects.forEach((select) => {
      let updateNeeded = false;
      [... select.options].forEach(option => {
        if (unavailableRE ? option.textContent.match(unavailableRE) : option.textContent.includes("Unavailable")) {
          if (option.selected) updateNeeded = true;
          option.remove();
        }
      });

      if (updateNeeded) {
        select.options[0]?.setAttribute('selected', true );
        select.dispatchEvent(new Event('change', { bubbles: true }));
      }
    });
  };

  checkAndProcessNewElement = (el) =>  {
    if (el.tagName == 'VARIANT-SELECTS') cleanupVariantSelectsIn(el);
  }

  observeProductInfo = (mutations, observer) => {
   for (const mutation of mutations) {
      if (mutation.type === "childList") {
        mutation.addedNodes.forEach(checkAndProcessNewElement);
      }
    }
  };

  var mo = new MutationObserver(observeProductInfo);
  var productInfo = document.querySelector('.product__info-container');
  if (!productInfo) return;

  cleanupVariantSelectsIn(productInfo);
  mo.observe( productInfo, { childList: true });
});
</script>
the conde in this post amended to include the <script> and </script> tags
if my post is helpful, please like it ♡ and mark as a solution -- this will help others find it
1 Like
@tim_1 Thank you for your response. But where do I put this? after I click “edit code”, which file do I click on? and where do I paste this in that file?

In Theme=> Customize.
Theres a million options after clicking “theme “ → “Customize”
Are you recommending that I go to a product page, select “Theme Settings” , then “Custom CSS” and past it at the bottom of this section?

…cause if so, that didn’t work.

Can you please give more specifics on your directions?
Hi @coletteraine,
This will need more JS code for it, can I send you a collaborator invite? It will help me test things better.
Not a “Custom CSS” setting, but “Custom liquid” section.
@namphan What is collaborator invite? (Does that allow you to directly edit my store within Shopify?) and how do I send you one?
@tim_1 I feel like I’m still getting partial directions from you. Can you please lay out exactly where to go, how to get there, and where to input this code? (For example Step 1 → Step 2 → Step 3 → Step 4, then copy & paste the code at the top/bottom/after a certain exact line)
It’s all in the first post.
Go to Themes=> Customize, navigate to a Product page in the right pane, add a section called “Custom Liquid” right below “Product information” and paste my code into this section only setting.
Theme code edits not required.
Hi @coletteraine,
You can refer to the following article about Collaborator accounts
When I get a collaborator invitation, I can access the theme source, duplicate it and try to debug to find the best solution.
Hope it is clear to you
@tim_1 noting this worked for me in Dawn 15.3.0
also just mentioning for those that don’t realise, it’s gotta be surrounded by tags in the “Custom liquid” section
@coletteraine below is broadly the order you gotta click things in

oops, by “script” tags lmao
1 Like
Thanks mate – good catch!
Amended the code in the original post to include <script> and </script> tags.
Third-party apps make it easy to separate variants I own the Stamp ‑ Variants on Collection and we help merchants display variants separately on the collection page and home page. You can customize the settings per collection to show or hide specific variants, filter variants, or separate them by specific options. For example, you can create a “Gold” collection and display only gold-related variants.
You can easily hide unavailable variant choices in a simple and intuitive way using the Easify Product Options app — no coding or complicatxed theme edits required. Instead of showing confusing “Unavailable” options, you can use Dropdowns + Conditional Logic to display only the selections that actually match the customer’s previous choices.
Here’s an example I’ve created so you can see how it works:
- This is the result:


- This is the app setting:
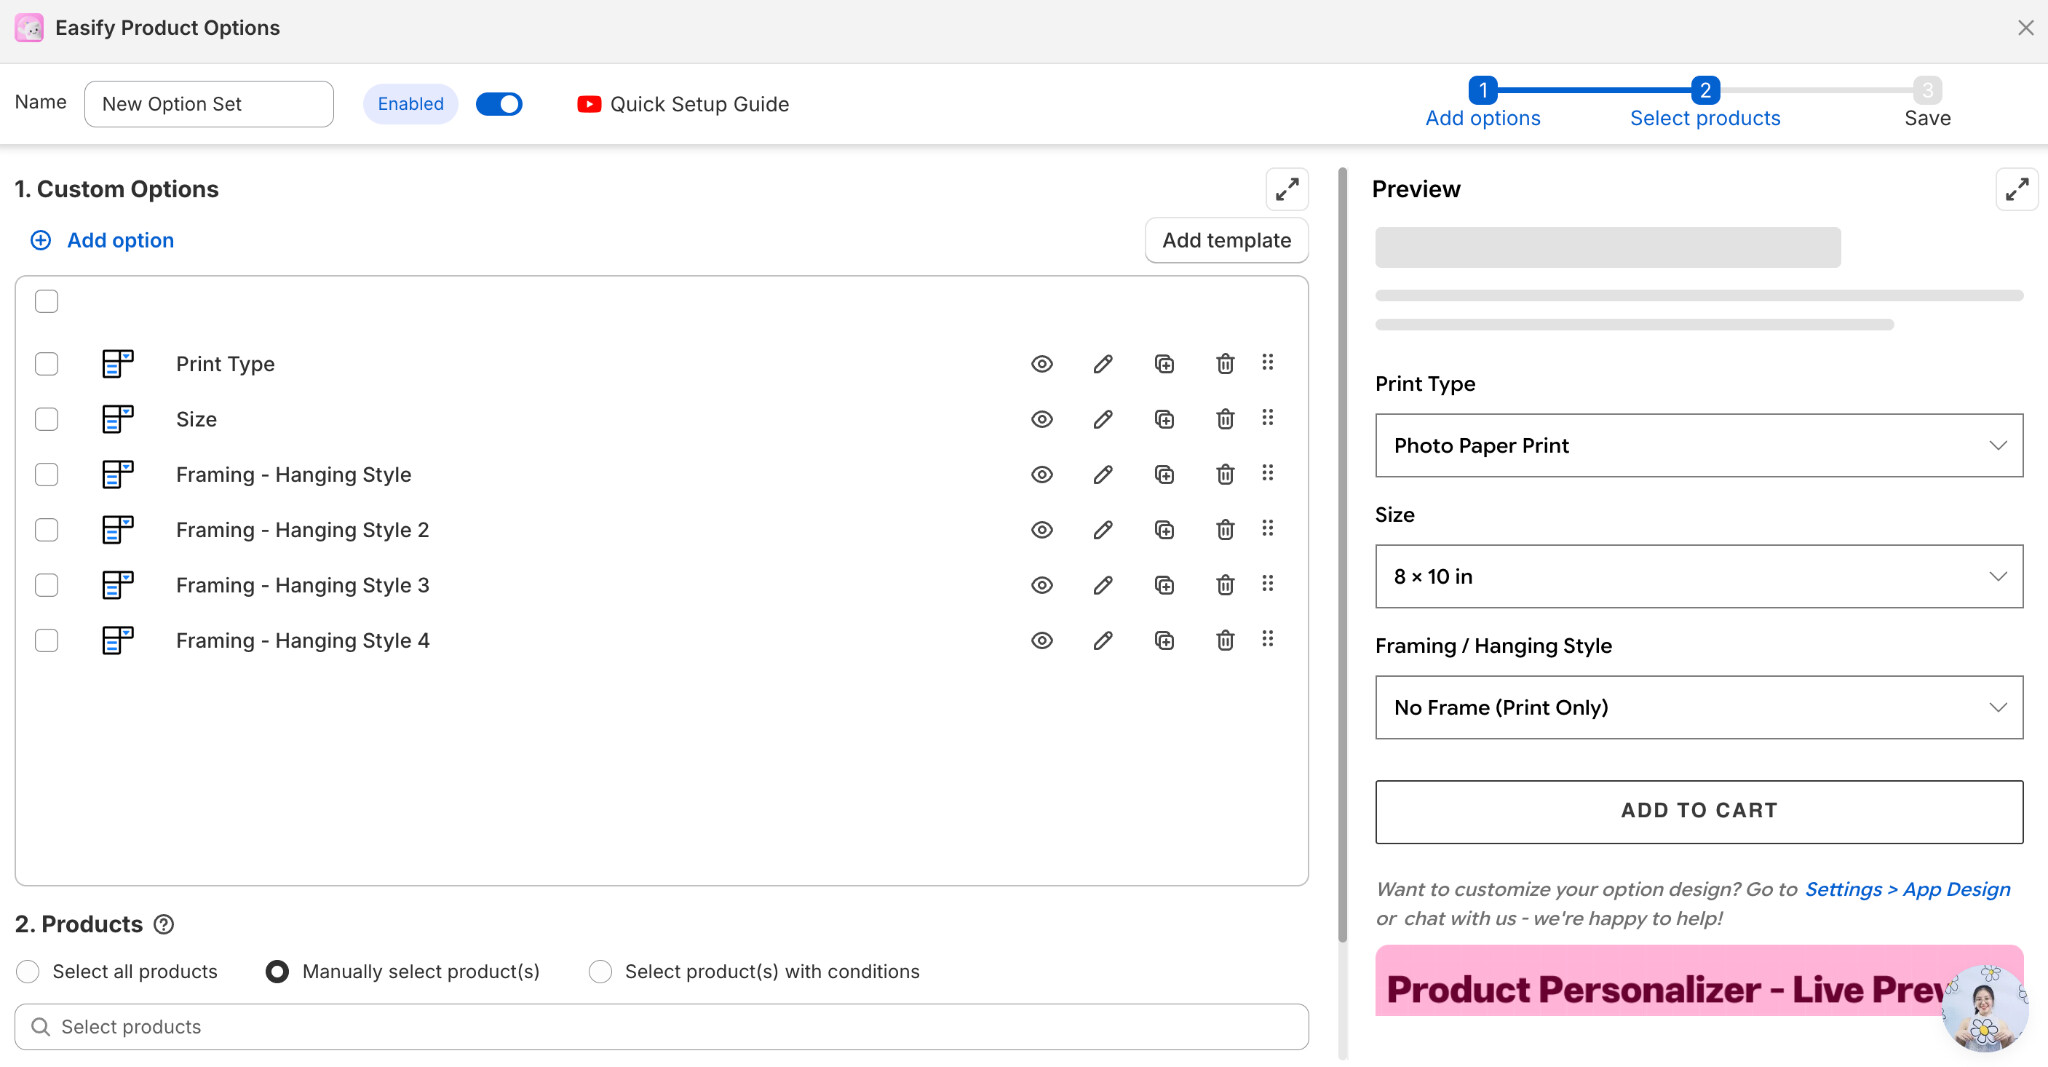
First, you can create Dropdown options in Easify. Using dropdowns keeps your interface clean and easy to follow, preventing customers from feeling overwhelmed or confused by too many visible choices at once.

After that, to show or hide options based on the selected Print Type, simply go to the Advanced settings of each option in Easify Product Options and enable Conditional logic. Then set up the conditions so each option only appears when it’s relevant.
For example:
If Print Type = Metal, then the Size dropdown will only display sizes that support Metal, and the Framing / Hanging Style dropdown will only show the framing options compatible with Metal.
Easify makes customization effortless — it’s simple to set up and works flawlessly for personalized products. Their support team is also amazing if you need any guidance! ![]()