This is an advanced tutorial and is not supported by Shopify. Knowledge of HTML, CSS, JavaScript, and Liquid is required. Consider hiring a Shopify Expert if you aren’t comfortable doing the steps in the tutorial.
If you have products that are out of stock, you can sell them as pre-orders. This is done by creating an alternate product template, and editing your payment settings. You can also use this customization to continue selling products that are on back-order.
Note: This customization isn’t compatible with dynamic checkout buttons. If your theme supports dynamic checkout, then prevent the buttons from showing by following the steps to hide dynamic checkout buttons on product pages.
Sectioned and non-sectioned themes
The steps for this tutorial differ depending on whether you are using a sectioned or a non-sectioned theme. A sectioned theme is a newer theme that lets you drag and drop to arrange the layout of your store’s pages.
To figure out whether your theme supports sections, go to the theme’s Edit code page. If there are files in the Sections directory, you are using a sectioned theme. Non-sectioned themes were released before October 2016, and do not have files in the Sections directory.
If you are using a sectioned theme, then click the Sectioned themes button and follow the instructions. If you are using an older, non-sectioned theme, then click the Non-sectioned themes button and follow the instructions.
When selling products as pre-orders, you should not capture payment immediately unless the customer is aware that they are purchasing a product that is not currently available. Instead, you can authorize a payment without capturing the funds immediately. Authorizing a payment at the time of checkout allows you to capture the funds at a later date, when the product is available and you are ready to fulfill the order.
Note: If you communicate to your customers that you are charging them in advance for a product that will ship at a later date, then you are able to capture funds immediately for a pre-order product.
From your Shopify admin, go to Settings > Payment providers.
Scroll down to find the Payment authorization section.
Caution: Authorization periods expire after a certain period of time. After an authorization expires, you may no longer legally capture payment for that order. Shopify Payments has an authorization period of 7 days. To authorize payments for a longer period, you must use a third-party payment gateway.
Creating a pre-order product page template
To change the Add to cart button text for your pre-order products, you must create a new product template.
From your Shopify admin, go to Online Store > Themes.
Find the theme you want to edit, and then click Actions > Edit code.
In the Templates directory, click Add a new template.
From the drop-down menu, select product, and name the template pre-order:
Click Create section. Your new product-pre-order-template.liquid file will open in the code editor. Delete all of the default code, so that the file is blank.
In the Sections directory, click product-template.liquid. Copy all of the content from this file, and paste it into your new product-pre-order-template.liquid file.
In your new product-pre-order-template.liquid file, find and replace the Add to cart button text.
Every theme is different, and the code used for the Add to cart button text may vary. If you replace instances of products.product.add_to_cart with Pre-order (leaving all other punctuation intact), then your Add to cart button text should change to read Pre-order instead.
Note: If you can’t find the above lines of code, then they might be found in your product-pre-order-template.liquid file instead.
Click Save.
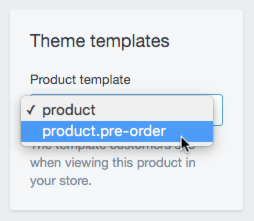
Assigning the template to a product
From your Shopify admin, go to Products > All products.
Click the name of the product you want to make available for pre-order.
In the Theme templates sidebar section, change product to product.pre-order:
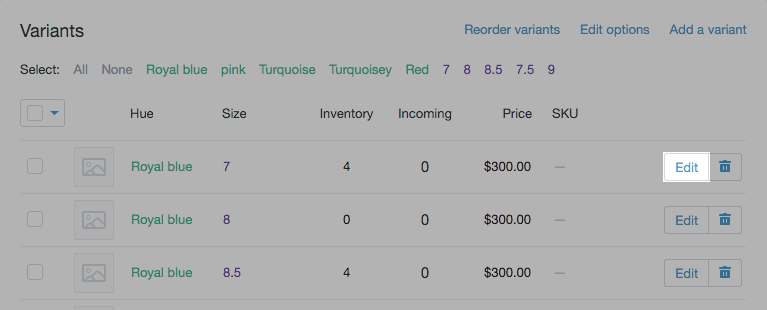
If you are tracking inventory for a product, then you might want to allow customers to purchase pre-order products even if they have an inventory amount of 0.
To edit the inventory settings for a product:
From your Shopify admin, go to Products > All products.
Click the name of the product you want to make available for pre-order.
Note: This setting is available for each variant, so you must change the setting for each one that you would like to be available for pre-order. You can edit all the variants of a product at the same time by using bulk editing.
When selling products as pre-orders, you should not capture payment immediately unless the customer is aware that they are purchasing something that is not currently available. Instead, you can authorize a payment without capturing the funds immediately. Authorizing a payment at the time of checkout allows you to capture the funds at a later date, when the product is available and you are ready to fulfill the order.
Note: If you communicate to your customers that you are charging them in advance for an item that will ship at a later date, then you can capture funds immediately for a pre-order product.
From your Shopify admin, go to Settings > Payment providers.
Scroll down to find the Payment authorization section.
Caution: Authorization periods expire after a certain period of time. After an authorization expires, you may no longer legally capture payment for that order. Shopify Payments has an authorization period of 7 days. To authorize payments for a longer period, you must use a third-party payment gateway.
Creating a pre-order product page template
To change the Add to cart button text for your pre-order products, you must create a new product template.
From your Shopify admin, go to Online Store > Themes.
Find the theme you want to edit, and then click Actions > Edit code.
In the Templates directory, click Add a new template.
From the drop-down menu, select product, and name the template pre-order:
In the same file, look for a tag that contains this line of code:
addToCart: {{ 'products.product.add_to_cart' | t | json }},
Replace it with:
addToCart: {{ 'Pre-order' | json }},
Every theme is different, and the code used for the Add to cart button text may vary. If you replace instances of products.product.add_to_cart with Pre-order (leaving all other punctuation intact), then your Add to cart button text should change to read Pre-order instead.
Note: If you can’t find the above lines of code, then they might be found in your theme.liquid file instead.
Click Save.
Assigning the template to a product
From your Shopify admin, go to Products > All products.
Click the name of the product you want to make available for pre-order.
In the Theme templates sidebar section, change product to product.pre-order:
If you are tracking inventory for a product, then you might want to allow customers to purchase pre-order products even if they have an inventory amount of 0.
To edit the inventory settings for a product:
From your Shopify admin, go to Products > All products.
Click the name of the product you want to make available for pre-order.
Note: This setting is available for each variant, so you must change the setting for each one that you would like to be available for pre-order. You can edit all the variants of a product at the same time by using bulk editing.
Doesnt seem to work. When I create a new product.pre-order.template there is nothing in it. Just 5 lines of code saying the contents can be found in sections. So there is no way for me to alter the template before creating a new section to be used?
When I create a new product template, it has only 5 lines of code in it, just telling you the contents of that file can be found in the sections file.
I have tried creating a new sections file, copying the code from the existing one, and changing the "addtocart’ to ‘pre-order’ but it doesnt do anything.
I have done all that’s suppose to do, even turn off “Show dynamic checkout button” in theme as said by ToxonTech. But it’s still showing both the ‘pre-order’ button and also below it shows the ‘Buy it Now’ button.
This worked for me, except that now it made the order text boxes wider, thus making the product image smaller. How can I get the layout back to how it was (red shirt), with the Pre-Order changes? See images below
This pre-order option looks like it could work really well for me. For those of you who have tried it, please let me know how the buttons work. If I change my product to the pre-order template but only set one variant to allow ordering when out of stock, do my other variants still show the ‘buy now’ and ‘out of stock’ buttons?
I have followed the instructions and am using Debut theme. Pre-order button is working, but for the variant that I have in stock, it still says pre-order. How do I adjust this so it actually shows as an add to cart variant? Thanks for the info so far.
I’ve followed all intrucstion and using the Debut theme. It works well on the product page, showing Pre-Order Button. But once testing to place the order, i got the error message : “Your cart has been updated and the items you added can’t be shipped to your address. Remove the items to complete your order.”
The shipping rules have been set same as all other products… so I’m on sure where the problem is ?