Tutorial: Making Your Product Description Full Width

This tutorial outlines how to make your product description full width. Following this tutorial will take your description from looking like this:

To this:

Note:

If you’re using a free theme from Shopify, then our Support team might be able to help you with this tutorial. Although Shopify can help you with many customizations, some kinds of customizations aren’t supported.

If you’re using a paid theme, then your theme was made by a third-party developer and Shopify’s Support team can’t help you with it. If you need help customizing a paid theme, then consider hiring a Shopify Expert. Similar to free themes, some kinds of customizations aren’t supported because of limitations associated with the theme or Shopify admin.

Disclaimer:

Due to the unique layout on the Express and Narrative themes, this customization would not be compatible.

Simple already has an admin option to enable this feature, instructions are located at the bottom of this tutorial.

Important:

The following tutorials are tested on themes published on Sept 2020

Debut

1. Under Sections open the ‘product-template.liquid’ file.

2. Find {{ product.description }}. Copy and remove everything between the opening and closing <div brackets and then paste it in the new location as shown below:

The final result should look like this:

3. Click Save.

Venture

1. Under Sections open the ‘product-template.liquid’ file.
2. Find {{ product.description }}. Copy and remove everything between the opening and closing <div brackets and paste it in the new location as shown below:

4. In the same file, find {% if section.settings.social_sharing_products %} and delete the ‘


’ tag directly below it and click Save.

The final result should look like this:

5. Click Save.

6. Open ‘theme.scss.liquid’ and at the bottom of the file paste the following CSS:

.rte.product-single__description {
 padding-bottom: 50px;
}

@media only screen and (max-width: 749px) {  
  .rte.product-single__description {
    padding-left: 15px;
  }
}

7. Click Save.

Minimal

1. Under Sections open the ‘product-template.liquid’ file.

2. Find {{ product.description }}. Copy and remove the highlighted code surrounding it, as seen below including the social sharing section. Paste this code to the location shown in the image:

The final result should look like this:

  1. Click Save.

Brooklyn

1. Under Sections open the ‘product-template.liquid’ file.

2. Find {{ product.description }} Copy and remove the code surrounding it, as seen below including the social sharing section and paste it to the location shown in the image:

![05-51-7pn66-pj3m2|884x328](upload://bSetXgEl0y7FzIxgG3E8ydGUVBN.png)

The final result should look like this:

![05-54-vb8ib-g58jq|858x332](upload://AwlmaY5ZbB2fBXwHbuLnKcJMKvz.png)

3. Click Save.

Boundless

1. Under Sections open the ‘product-template.liquid’ file.

2. Find the following code in that file:


Replace it with the following:


3. Find the following code:


Replace it with the following:


4. Click Save.

5. Open ‘theme.scss.liquid’ and at the bottom of the file add the following CSS:

@media only screen and (min-width: 750px) {
  .product__form--add-to-cart {
    max-width: 100%;
    text-align: center !important;
  }
  
  .product__policies.rte {
    text-align: center; 
  }
  
  .product-single__description.rte {
    width: 97%;
  }
  
  .custom-description-width {
    padding-left: 30px !important;
  }
}

@media only screen and (max-width: 749px) {
  .custom-description-width {
    padding-left: 0;
  }
}

6. Click Save.

Supply

1. Under Sections open the ‘product-template.liquid’ file.

2. Find {{ product.description }} Copy and remove everything between the opening and closing <div brackets as well as the social sharing section and paste it directly above the following code {% if section.settings.related_products_enable %} as shown below:
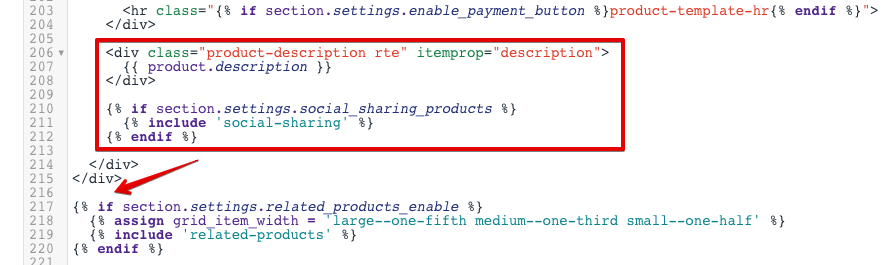
The final result will look like below:

3. Click Save.

Simple

The Simple theme already has this functionality built-in.

1. Go to Online store > Themes and then select "Customize" next to your current theme.

2. Click on Product pages from the dropdown on the top left-hand side of the customizer. Select Product pages on the left under sections as shown below:

3. You should then see the option to alternate between showing the description below the image and to the right:

4. Click Save.

with Narrative there is no chance to do this edit?

Hey there, @DonnieDarko

Due to the unique layout of the Express and Narrative themes, this customization would not be compatible. I would recommend hiring a Shopify Expert.

All the Best,

Bo

Hi Bo,

Thanks for sharing. But I could only find the ‘needed’ edit code in Snippets/product-template.liquid.

And where I should move the code set?

Also I want to have 3 reviews in full width ( there is only 1 review under the product description with the same width). Please advise how to do it.

Fasar,

Your requests would be best made as its own post on Shopify Design’s forum. I’m sure you will be able to find someone who has done it themselves or a professional who can offer help. Shopify will not give advice for your requests since they’ve explicitly said this is not what they support.

Also, remember you have 30 minutes of complimentary expert design assistance with every store on Shopify.

Cheers!

Thanks for the heads up.

The 30 minutes of complimentary expert design assistance is from Shopify or the other professionals?

Hey there, @Fasar

Thank you for reaching out regarding this. I would recommend creating a new thread for your question on our design board as recommended above for your additional queries. Please also read Help Us Help You so you know all the relevant information to provide when looking for design support in the Shopify Community.

As per your initial question about only being able to find the relevant code in the Snippets folder, could you please confirm which theme it is that you are using, please? If it is not a Shopify Supported theme I will be unable to help - from your screenshot it looks like it could be the Debutify theme which is supported by their own team here.

As for the 30 minutes design time - this is actually 60 minutes of design time on Shopify Supported themes for all stores on the Basic Plan or higher. Third-party themes cannot avail of this time. Although Shopify Support is able to support a wide range of basic customizations, keep in mind that Shopify can’t help with the following tasks:

  • Implementing unsupported tutorials
  • Customizing or troubleshooting themes that contain significant code changes
  • Installing, removing, or modifying third-party apps (apps not developed by Shopify)
  • Customizing or troubleshooting third-party code (code not developed by Shopify, including code from Experts and Forums)
  • Customizing or troubleshooting content added via the rich text editor.
  • Adding new fonts
  • Editing slideshows (including sizing, cropping and functionality)
  • Adding pop-ups
  • Adding additional add to cart buttons on product pages or collection pages
  • Changing drop-down menus into buttons
  • Providing advanced collection sorting and filtering
  • Making a theme wider or narrower
  • Making an unresponsive theme responsive
  • Adding infinite scroll (showing more products or content as the page scrolls)
  • Editing images (including cropping, adjusting color profiles, removing backgrounds, etc.)
  • Adding hover effects to product images
  • Adding labels or badges on collection pages
  • Adding color swatches
  • Implementing changes that provide misleading or deceptive information to customers
  • Moving features from one theme to another
  • Changing the color of payment icons
  • Editing the code for the checkout (except for Shopify Plus)
  • Custom translation services (including Order Printer and E-mail Notification Templates)
  • Providing coding instructions or feedback

Note

This is not an exhaustive list of unsupported customizations. Shopify Support assesses customization eligibility on a case-by-case basis.

To avail of design time, please reach out to our Support Team directly. To reach out to our support team please do visit the Help Centre. When on the Help Centre page, you should see Support > Contact Support in the main menu or there’s a Contact Shopify Support button near the end of the page. The Help Centre will try and suggest guides first to resolve your query, however, if none of these suit your needs then please keep clicking the Contact Shopify Support button at the end of the page instead.

In some cases, Chrome extensions and cache can interfere with the Help Centre’s login/authentication process and you might experience a “loop” when trying to contact our support. If this happens, I’d recommend clearing your cache or tlog out of your Help Centre account and access our support as a guest instead as shown in this short video. Our advisors can authenticate the account later if needed or our Facebook and Twitter support would be happy to help instead. You are welcome to contact us here on Twitter or here on Facebook.

All the Best,

Bo

Thanks for the info.

I’m using Debutify 2.0.2 theme with ‘Best Currency Converter’ App.

Thank you for your response, @Fasar . As Debutify is not a Shopify Supported theme I will be unable to help. The Debutify theme is a third-party theme which is supported by their own team here.

All the Best,

Bo

Thanks a lot for this!!! If i place an image in the description, how can I also make it full width?

I’m using Debut, but when I follow the instructions it makes the text hug the very very edge of my screen on the left. Is there anyway to fix this with a margin?

Wow great job thanks !!!

I would like to know how to reduce blank space on the margin right and left on the main thème …

Because it’s too big on the margins … for the Home page And Article or Blog Page
All good for product page and collection page
It’s for Sense Theme, thanks in advance !! :slightly_smiling_face: